Mastering the Cranberry Pineapple Gelatin Mold with Topping: A Timeless Classic
There are some dishes that transcend mere recipes, becoming woven into the fabric of family traditions and holiday gatherings. The cranberry pineapple gelatin mold is undoubtedly one of them. Far more than just a simple side, this vibrant, jiggly creation, often crowned with a luscious cream cheese topping, evokes a sense of nostalgia and comfort. It's a dish that beautifully marries the tartness of cranberries, the sweetness of pineapple, and the fruity zest of raspberry gelatin, all brought together in an elegant, eye-catching presentation.
While often associated with holiday feasts like Thanksgiving, the cranberry pineapple gelatin mold is versatile enough to grace any potluck, picnic, or even a warm-weather barbecue. Its refreshing texture and bright flavors make it a delightful counterpoint to richer savory dishes, and its ease of preparation makes it a favorite for hosts looking for make-ahead options. Let's delve into what makes this classic so beloved and how you can master it in your own kitchen.
The Enduring Appeal of the Cranberry Pineapple Gelatin Mold
Why has the cranberry pineapple gelatin mold maintained its popularity for decades, even in an era of culinary innovation? The answer lies in its unique combination of attributes:
- Nostalgic Comfort: For many, it's a taste of childhood, a dish served at grandma's table that brings back cherished memories. It represents a simpler time and the warmth of family celebrations.
- Striking Presentation: A beautifully unmolded gelatin ring, especially with a creamy center, is undeniably impressive. Its vibrant ruby-red hue makes it a festive addition to any spread, instantly catching the eye.
- Flavor Harmony: The careful balance of flavors is key. The sweet-tart punch of cranberry sauce and crushed pineapple is perfectly complemented by the fruity notes of raspberry gelatin. The optional, but highly recommended, crunchy walnuts add another layer of texture and earthy undertones.
- Refreshing Texture: In a meal often laden with heavy dishes, the light, cool, and jiggly texture of a gelatin mold offers a delightful palate cleanser. It’s particularly welcome during warmer months or as a refreshing break during a hearty holiday dinner.
- Make-Ahead Convenience: One of its biggest advantages is that it must be made in advance. This allows hosts to prepare a significant component of their meal days before an event, reducing stress on the big day.
This dish is a testament to the fact that sometimes, the classics are indeed the best. Its ability to delight both the eyes and the palate ensures its place as a perennial favorite.
Crafting Your Perfect Gelatin Mold: Ingredients and Preparation
The foundation of a great cranberry pineapple gelatin mold lies in its ingredients and the precise steps of its preparation. While the basic recipe is straightforward, paying attention to a few details can elevate your dish from good to scrumptiously memorable. Many have enjoyed this dish for Thanksgiving, noting its delightful taste, a testament to its reliability and widespread appeal.
Key Ingredients You'll Need:
- Raspberry Gelatin Powder: Two 3-ounce packages provide the primary flavor and vibrant color. Some recipes might suggest other red gelatins like cherry or strawberry, but raspberry offers a unique tart-sweet profile that complements the cranberries and pineapple beautifully.
- Unflavored Gelatin: A half (or sometimes a full) 8-ounce envelope of unflavored gelatin is crucial. This is your secret weapon for ensuring your mold sets firmly and holds its shape impeccably, especially when incorporating heavy fruit components. It adds structural integrity without altering the flavor.
- Boiling and Cold Water: Precision here is important for dissolving the gelatin properly and then cooling it down to prevent the fruit from sinking.
- Crushed Pineapple with Juice: An 8-ounce can is ideal. The crushed texture integrates seamlessly into the gelatin, distributing the sweet, tropical flavor evenly. Ensure you include the juice for extra flavor and moisture.
- Whole Berry Cranberry Sauce: A 15-ounce can of whole berry sauce is preferred over jellied. The intact berries provide delightful bursts of flavor and a lovely textural contrast within the smooth gelatin.
- Finely Chopped Walnuts: About 1/4 cup adds a wonderful crunch and a slightly earthy flavor that balances the sweetness and tartness. Pecans are a common substitute if preferred.
Step-by-Step Preparation:
- Prepare Your Mold: Lightly spray a 4-cup gelatin mold or a 9-inch square pan with vegetable oil cooking spray. This crucial step ensures easy release later. A light, even coating is all you need. For an Easy Cranberry Pineapple Gelatin: A Holiday Must-Make, this step is non-negotiable!
- Dissolve Gelatin: In a medium glass mixing bowl, combine both the raspberry and unflavored gelatin powders. Add 1 cup of boiling water. Stir continuously with a metal spoon for at least 2 minutes, or until both gelatins are completely dissolved. There should be no grainy residue.
- Incorporate Cold Water and Fruit: Stir in 1/2 cup of cold water. Once slightly cooled, add the crushed pineapple with its juice, the whole berry cranberry sauce, and the finely chopped walnuts. Stir thoroughly with a metal spoon until all ingredients are completely incorporated and evenly distributed.
- Chill to Perfection: Pour the mixture into your prepared mold. Cover with plastic wrap and refrigerate until firm. This usually takes at least 4-6 hours, but overnight chilling is always best for optimal firmness. Patience is key here; an under-chilled mold will not unmold gracefully.
For those interested in the origins, this method is reminiscent of Paula Deen's Classic Cranberry Pineapple Gelatin Salad Recipe, known for its reliable results.
Mastering the Art of Unmolding and Topping
The moment of truth for any gelatin mold is the unmolding. A perfectly released mold is a triumphant moment, and with a few simple techniques, you can achieve it every time. The topping then becomes the crown jewel, adding another layer of flavor and visual appeal.
Flawless Unmolding Techniques:
About an hour before you plan to serve, retrieve your firmly set gelatin mold from the refrigerator. Here are the most reliable methods for unmolding:
- The Room Temperature Release: This is a gentle and often effective method, particularly with well-sprayed molds. Simply invert the mold onto your desired serving platter and allow it to sit at room temperature. As the edges slightly warm, the gelatin will gradually release itself and come clean from the mold. This can take 30-60 minutes.
- The Warm Water Bath: For more stubborn molds, or if you're short on time, a quick warm water bath can do the trick. Briefly dip the bottom of the mold into a bowl of warm (not hot!) water for about 10-15 seconds. Ensure the water doesn't go over the rim of the mold. Gently pull the gelatin away from the edges of the mold with your fingers or a thin knife (if necessary). Place your serving platter on top of the mold, then confidently flip it over. The gelatin should slide out cleanly. If it doesn't, a very brief re-dip might be needed.
Once unmolded, gently center the gelatin on your platter. If it's slightly off-center, you can often carefully nudge it into position.
The Irresistible Cream Cheese Topping:
The creamy, slightly tangy topping provides the perfect counterpoint to the sweet and tart gelatin. It's incredibly easy to make:
- Ingredients: You'll need one 8-ounce package of cream cheese (softened), 1/4 cup of confectioners' sugar, 2 tablespoons of whipped cream (or heavy cream whipped to soft peaks), and another 1/4 cup of chopped walnuts for garnish.
- Preparation: In a bowl, combine the softened cream cheese, confectioners' sugar, and whipped cream. Mix together until smooth and well incorporated. You can use an electric mixer for a super-smooth consistency.
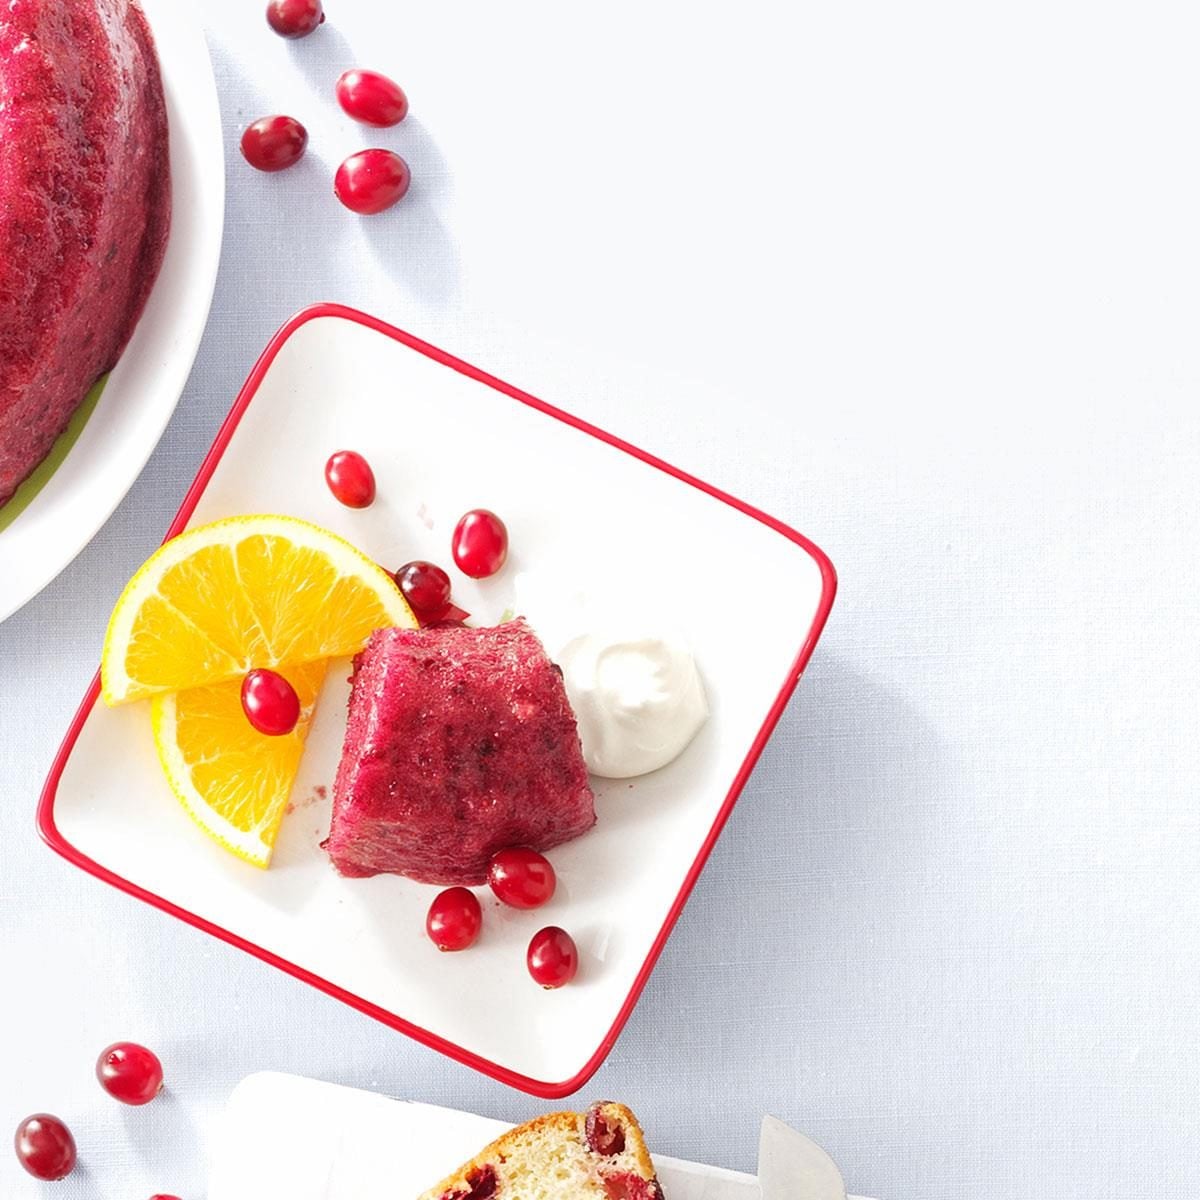
- Application: Spoon the cream cheese mixture into the center of the unmolded gelatin ring. You can create a rustic dollop or, for a more refined look, use a spatula to spread it evenly. Garnish generously with the remaining chopped walnuts. For an extra touch of elegance, consider piping the topping using a pastry bag with a star tip.
Tips for Success and Creative Variations
Beyond the core recipe, there are numerous ways to personalize and perfect your cranberry pineapple gelatin mold, making it truly your own.
Enhancing Flavor and Texture:
- Citrus Zest: A touch of orange or lemon zest stirred into the gelatin mixture adds a bright, aromatic lift that complements the fruit flavors beautifully. Add about 1 teaspoon of finely grated zest along with the cold water and fruit.
- Alternative Nuts: While walnuts are traditional, consider toasted pecans or slivered almonds for a different nutty note. Toasting them lightly beforehand enhances their flavor.
- Spice it Up: For a holiday twist, a pinch of ground cinnamon or nutmeg can add warmth and depth to the gelatin mixture, echoing traditional holiday flavors.
- Fruit Variations: While the core recipe is fantastic, don't be afraid to experiment. A small amount of drained mandarin oranges or even finely diced apples could be incorporated, though be mindful of adding too much extra liquid.
- Sugar Adjustment: If you prefer a less sweet gelatin, you can slightly reduce the amount of cranberry sauce or opt for unsweetened cranberry juice if making your own sauce. For the topping, adjust the confectioners' sugar to your taste.
Presentation Perfection:
- Garnishes Galore: Beyond the walnuts, consider fresh mint sprigs, a few whole fresh cranberries, or even delicate orange slices to adorn your serving platter and the topping. These add color and a professional finish.
- Individual Molds: For a sophisticated presentation, use individual ramekins or small silicone molds. Adjust chilling time as smaller portions will set faster. This is excellent for portion control and elegant plating.
- Swirl Technique: For a visually interesting effect, after pouring most of the gelatin into the mold, hold back a small portion. Let it cool slightly, then swirl in a tablespoon of extra cranberry sauce or a different colored jello (like lime) for a marbled look.
Troubleshooting Common Issues:
- Gelatin Not Setting: Ensure you're using fresh gelatin and accurate measurements of boiling and cold water. Undissolved gelatin won't set properly. Also, some fresh fruits like pineapple (if not canned/processed) contain enzymes that can break down gelatin; however, canned pineapple is processed and safe to use.
- Mold Sticking: Always thoroughly spray your mold with cooking spray. If it still sticks, give it a slightly longer warm water bath or allow more time at room temperature.
- Topping Too Thin/Thick: Adjust the consistency of your cream cheese topping with more confectioners' sugar for thickness or a tiny bit more whipped cream/milk for a thinner, more spreadable texture.
Conclusion
The cranberry pineapple gelatin mold is more than just a recipe; it's a testament to the simple joys of home cooking and shared meals. Its vibrant appearance, refreshing taste, and delightful texture make it a standout dish that consistently brings smiles to the table. By understanding the core techniques, embracing the versatility of its ingredients, and adding your own creative touches, you can master this timeless classic and make it a cherished part of your culinary repertoire for years to come. Whether for a festive holiday spread or a casual family dinner, this mold promises to be a memorable and delicious addition.
